Potential Warnings & Errors
Licensing errors
- 404 Not found appears if the NavVis device tries to access a non-existing software repository.
- 403 Forbidden appears if the NavVis device tries to access another existing software repository, but with the same login credentials.
- 401 Unauthorized appears when the login credentials for the NavVis device are invalid.
Warning Types
If the mobile mapping system detects a problem, a notification, warning, or error is displayed.
Warnings can be resolved by the operator without stopping the current mapping, while errors cannot be resolved without restarting the mapping.
The following warning messages can appear during mapping:
| Code | Description |
|---|---|
| WARN_LASER_HORIZ_INVALID_MEAS | Message: Please move the front of teh device towards the closest (< 30m) wall. |
| Cause: The Horizontal Laser is not acquiring enough close points for a stable and consistent localization of the device. | |
| WARN_TILT_HIGH | Message: Please bring the device back to a horizontal position. |
| Cause: The device is tilted more than 8 degrees. A high tilt of can cause problems with the localization and can lead to a poor mapping quality. | |
| WARN_SYSTEM_LOAD_HIGH | Message: Please slow down or pause the mapping for a while. |
| Cause: The system has a high computation usage. This can be due to a long mapping time. To achieve best results, the system should not work at full capacity. | |
| WARN_NODE_LOAD_HIGH | Message: Please slow down or pause the mapping for a while. |
| Cause: A software component has a high computation usage. This can be due to a long mapping time. In order to achieve best results, a software component should not work at full capacity. | |
| WARN_ODOM_JUMP | Message: |
| Cause: The localization engine detected an unrealistic movement. Depending on the situation, the map might have been corrupted. Please inspect the map for double walls or distortion. |
Error Types
| Code | Description |
| ERR_IMU_RATE_LOW ERR_LASER_HORIZ_RATE_LOW ERR_LASER_VERT_LEFT_RATE_LOW ERR_LASER_VERT_RIGHT_RATE_LOW | Message: Sorry, something went wrong. Please finish your current dataset and reboot the device |
| Cause: The mentioned sensor is not running with the expected rate. A long Mapping time might be the cause for this behavior. | |
| ERR_TF_RATE_LOW | Message: Sorry, something went wrong. Please finish your current dataset and reboot the device |
| Cause: A software component is not running with the expected rate. A long Mapping time might be the cause for this behavior. | |
| ERR_IMU_NO_MSGS_YET ERR_LASER_HORIZ_NO_MSGS_YET ERR_LASER_VERT_LEFT_NO_MSGS_YET ERR_LASER_VERT_RIGHT_NO_MSGS_YET | Message: Sorry, something went wrong. Please finish your current dataset and reboot the device |
| Cause: The motion sensor did not send any data yet. This is most likely a hardware problem. | |
| ERR_TF_NO_MSGS_YET | Message: Sorry, something went wrong. Please finish your current dataset and reboot the device |
| Cause: A software component did not send any data yet. This is most likely a hardware problem. | |
| ERR_IMU_MSG_TOO_OLD ERR_LASER_HORIZ_MSG_TOO_OLD ERR_LASER_VERT_LEFT_MSG_TOO_OLD ERR_LASER_VERT_RIGHT_MSG_TOO_OLD | Message: Sorry, something went wrong. Please finish your current dataset and reboot the device |
| Cause: The mentioned sensor stopped sending data. This is most likely a hardware problem, but a long Mapping time might be the cause for this behavior. | |
| ERR_TF_MSG_TOO_OLD | Message: Sorry, something went wrong. Please finish your current dataset and reboot the device |
| Cause: A software component stopped sending data. This is most likely a software problem, but a long Mapping time might be the cause for this behavior. | |
| ERR_TILT_HIGH | Message: Please bring the device back to a horizontal position. |
| Cause: The device is tilted too much. A high tilt of the device can cause problems with the localization and can lead to a poor mapping quality. | |
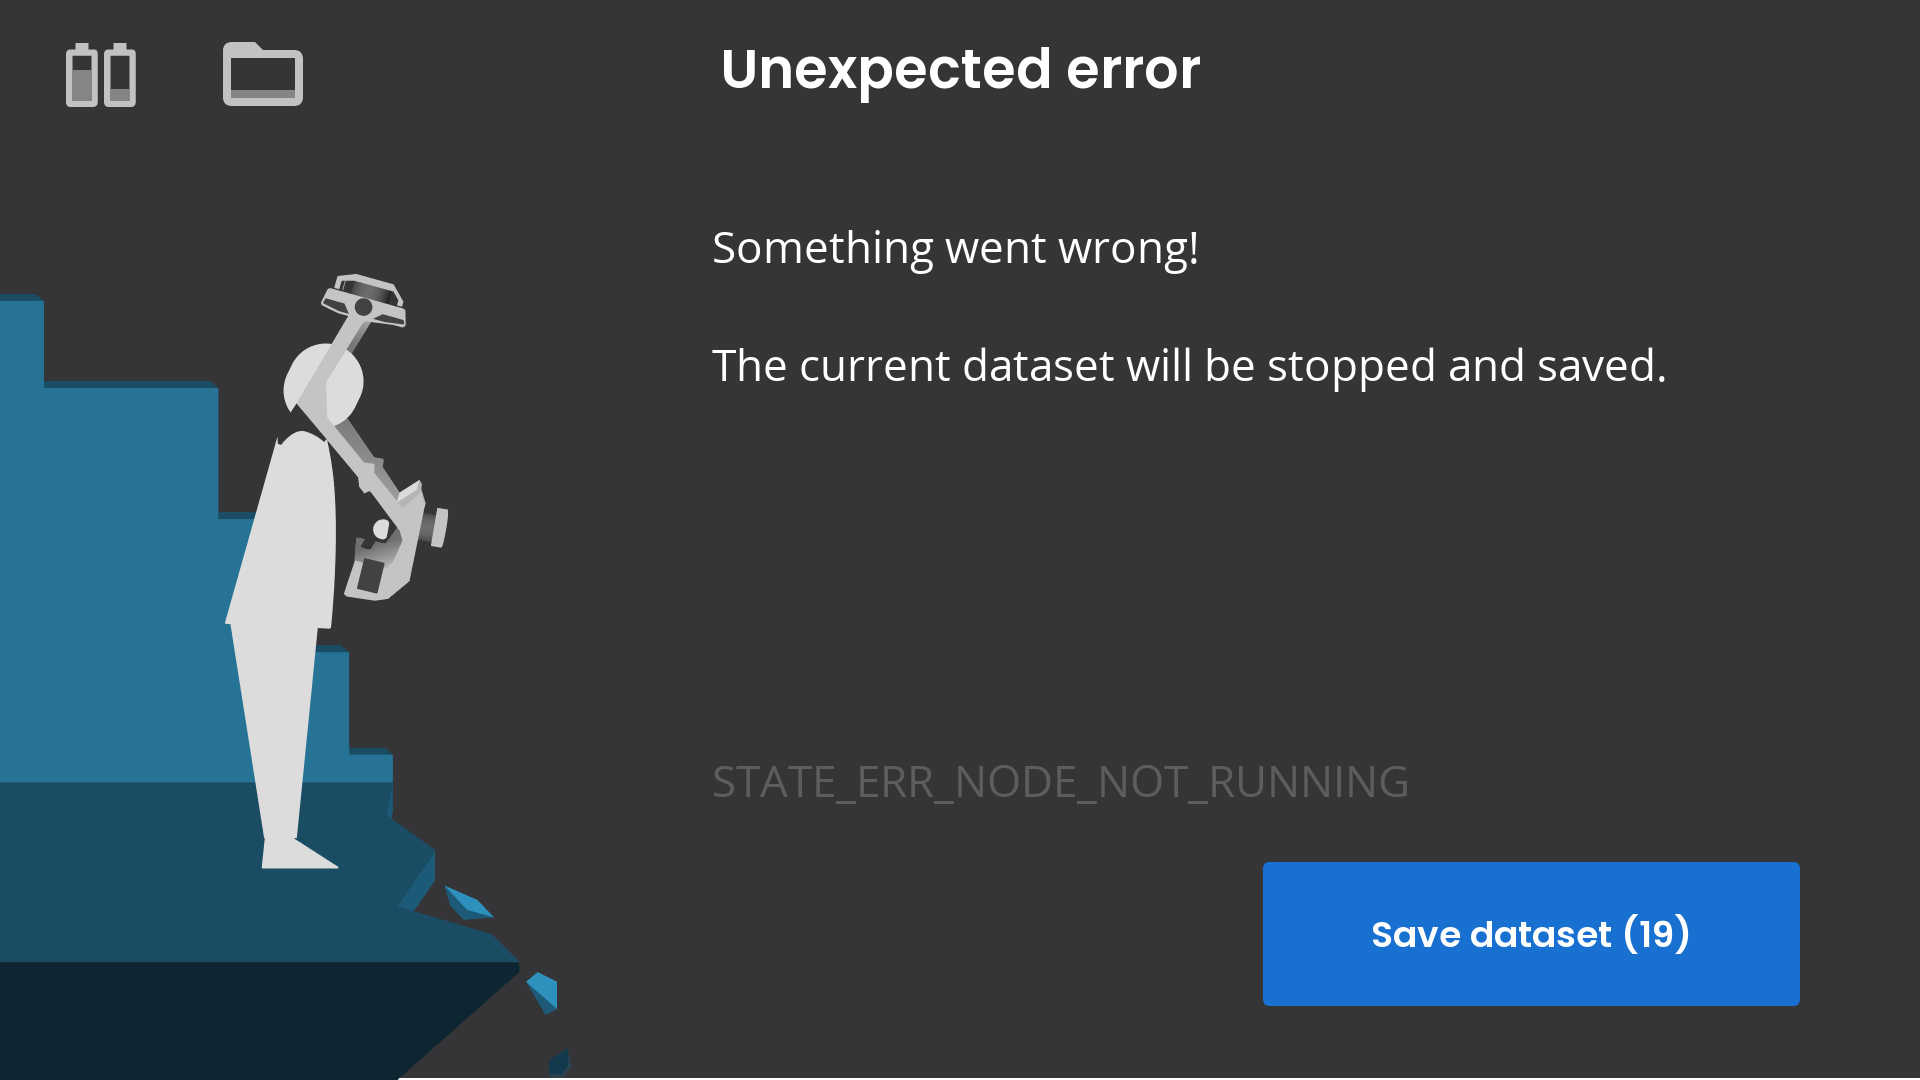
| ERR_NODE_NOT_RUNNING | Message: Sorry, something went wrong. Please finish your current dataset and reboot the device |
| Cause: A critical software component is not running. | |
| ERR_IMU_VALUES_NAN | Message: Sorry, something went wrong. Please finish your current dataset and reboot the device |
| Cause: The IMU is sending invalid data. This is most likely a hardware problem. |
Unexpected Errors
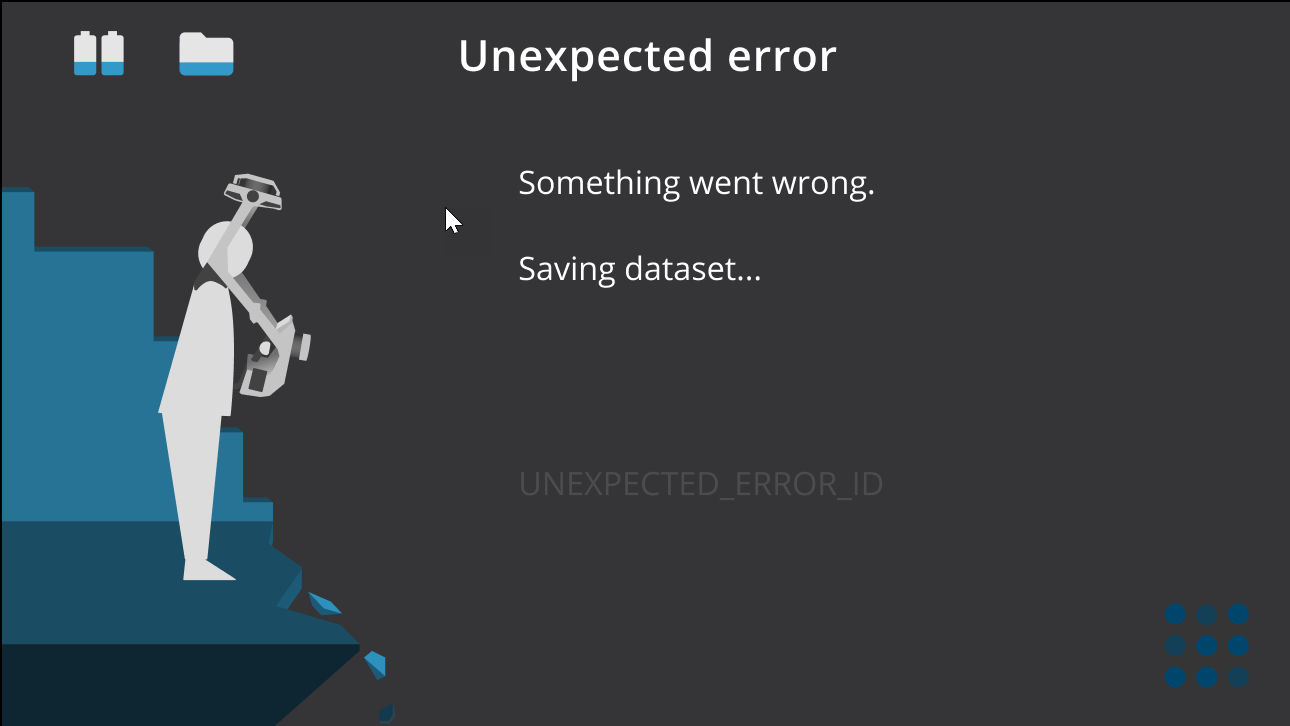
If the NavVis VLX has an unexpected hardware or software error, a message appears indicating the problem and advises the user to manually stop and save the dataset within 20 seconds. Restart the NavVis VLX and start another dataset.
Follow this procedure to manually stop and save the current dataset and then restart the NavVis VLX:
- From the Unexpected error screen, click Save dataset (20 SEC) to manually stop and save the current dataset. The countdown timer indicates the time left to save the dataset.Note: The NavVis VLX automatically saves the dataset after 20 seconds.
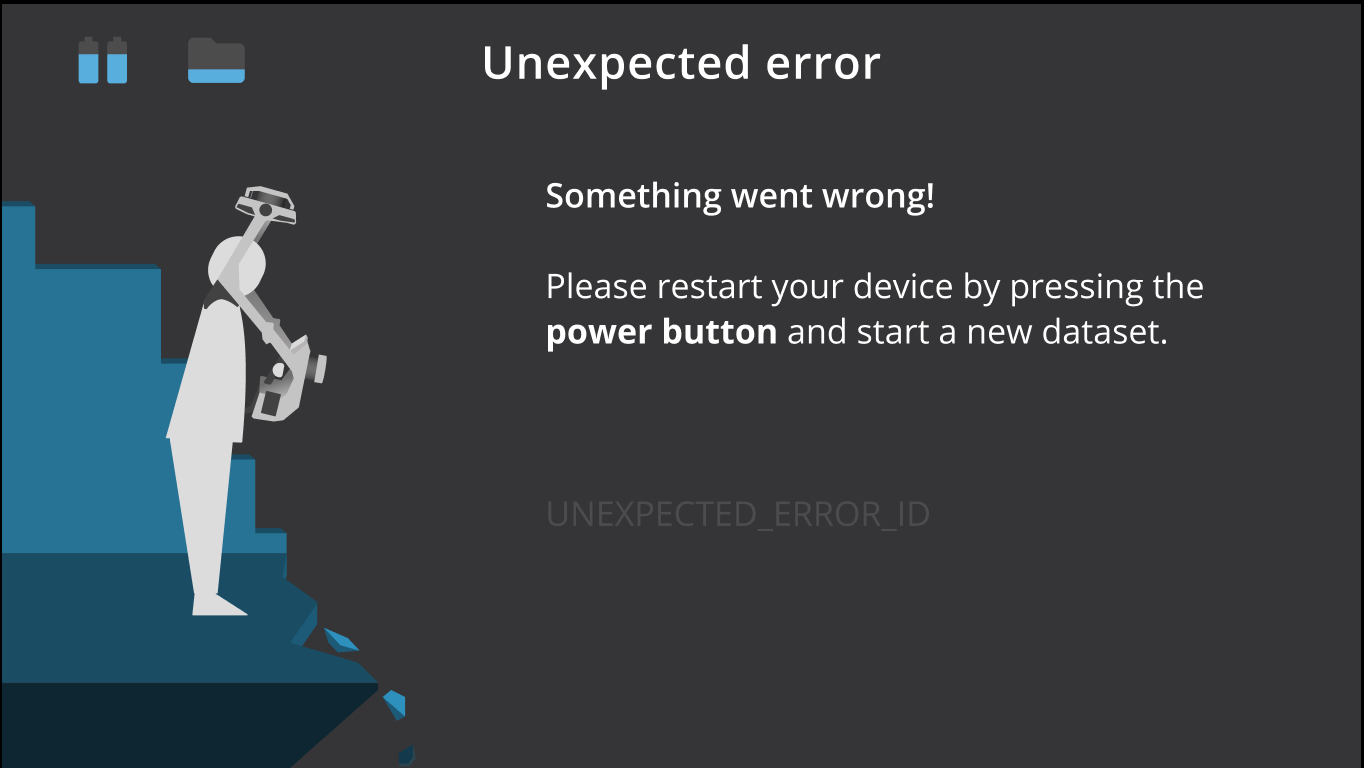
Restart the VLX by pressing the power button.
Start a new dataset.
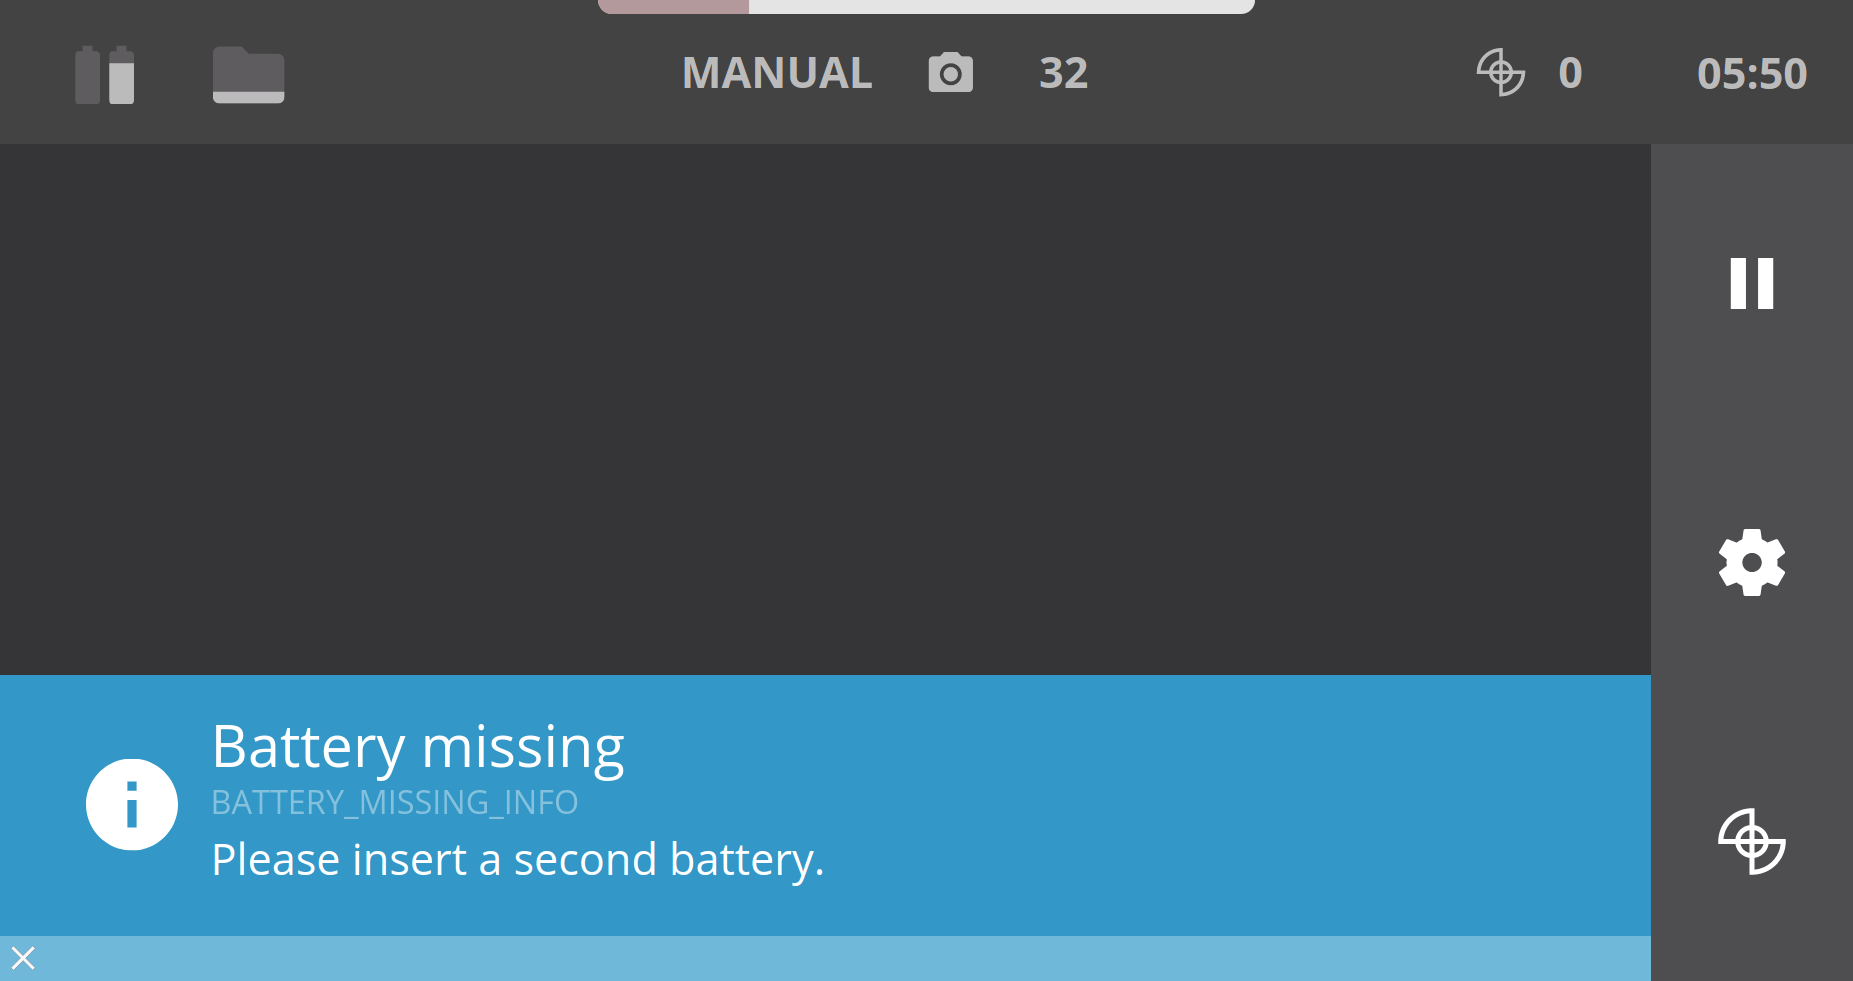
Battery Notifications
If the batteries on the NavVis VLX are missing, low in charge, or empty, a notification will appear with the severity of the battery problem and how to fix it. The severity of the battery notifications appears in blue for information, yellow for warning, and red for critical.
After starting the NavVis VLX, if the batteries on the device are in a warning or critical state (the charge is less than 20% or batteries are missing) a message will prompt the user to replace the batteries. Until they are replaced, the New dataset and Start Mapping buttons will also be disabled.
A blue Battery missing information notification appears 10 seconds after the battery is removed from the NavVis VLX. Before continuing, insert a second fully charged battery.
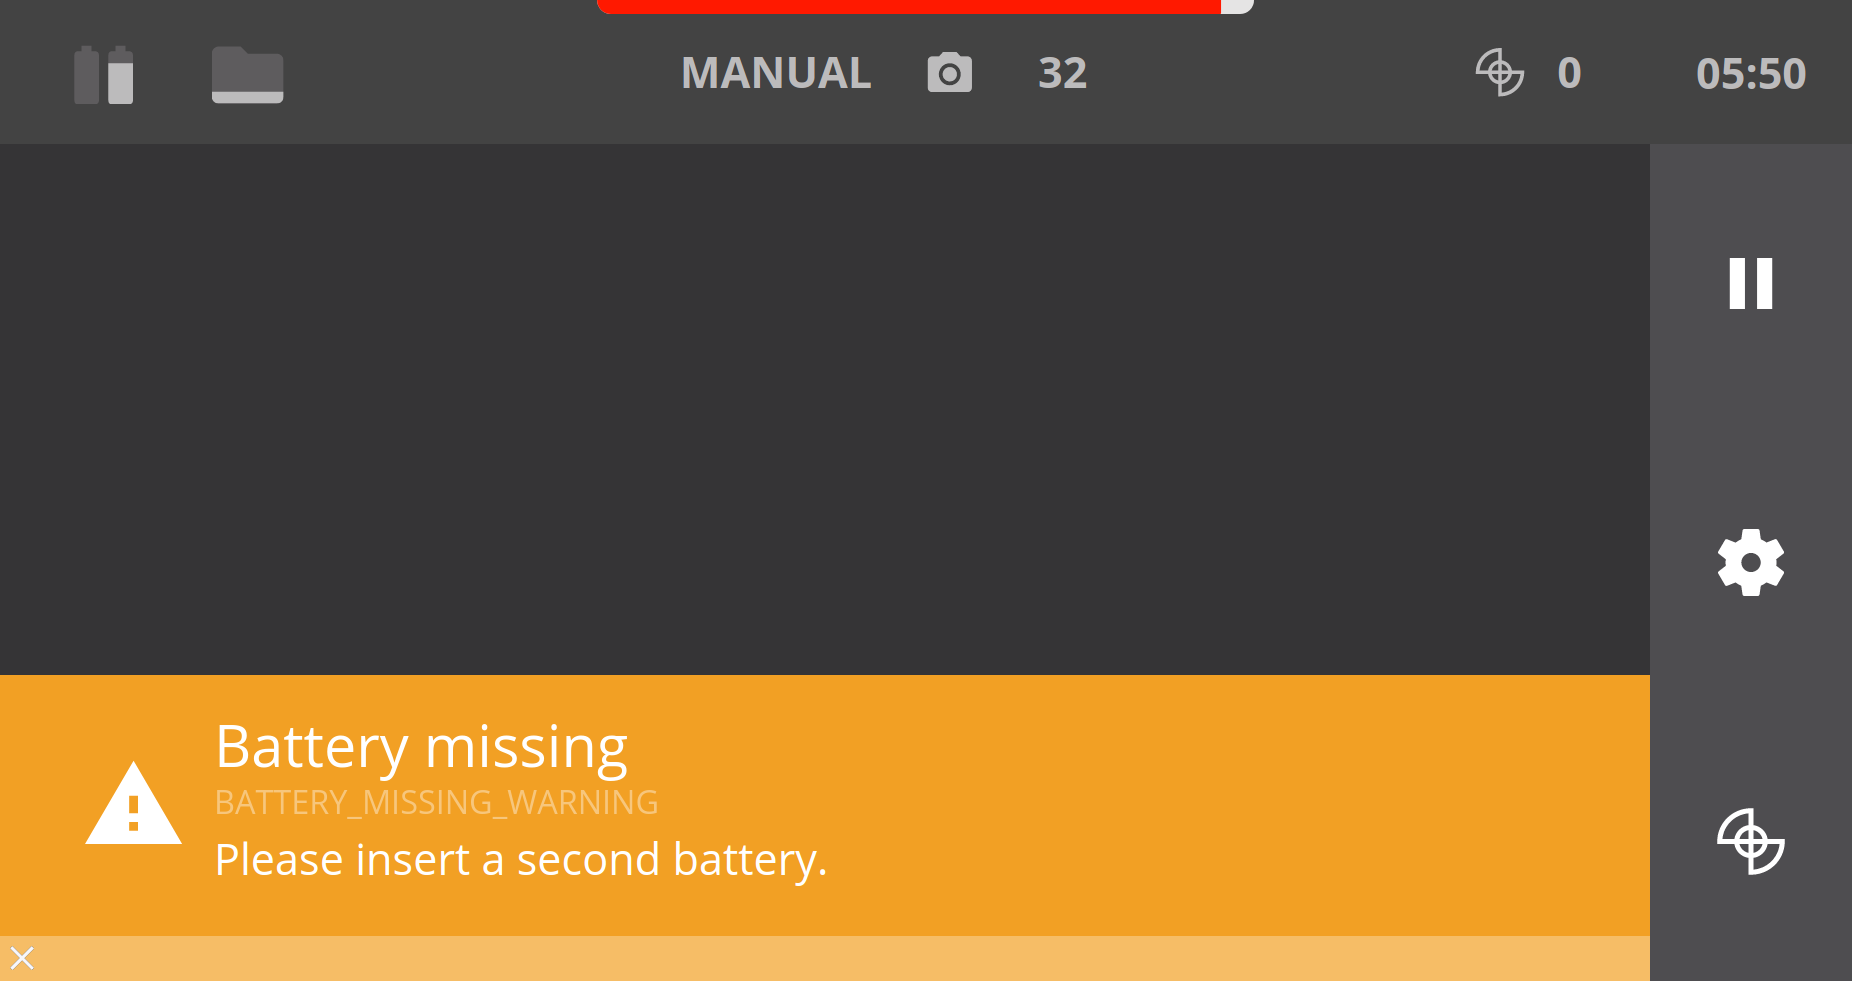
- A yellow Battery missing warning notification appears one minute after the battery is removed from the NavVis VLX. Before continuing, insert a second fully charged battery.
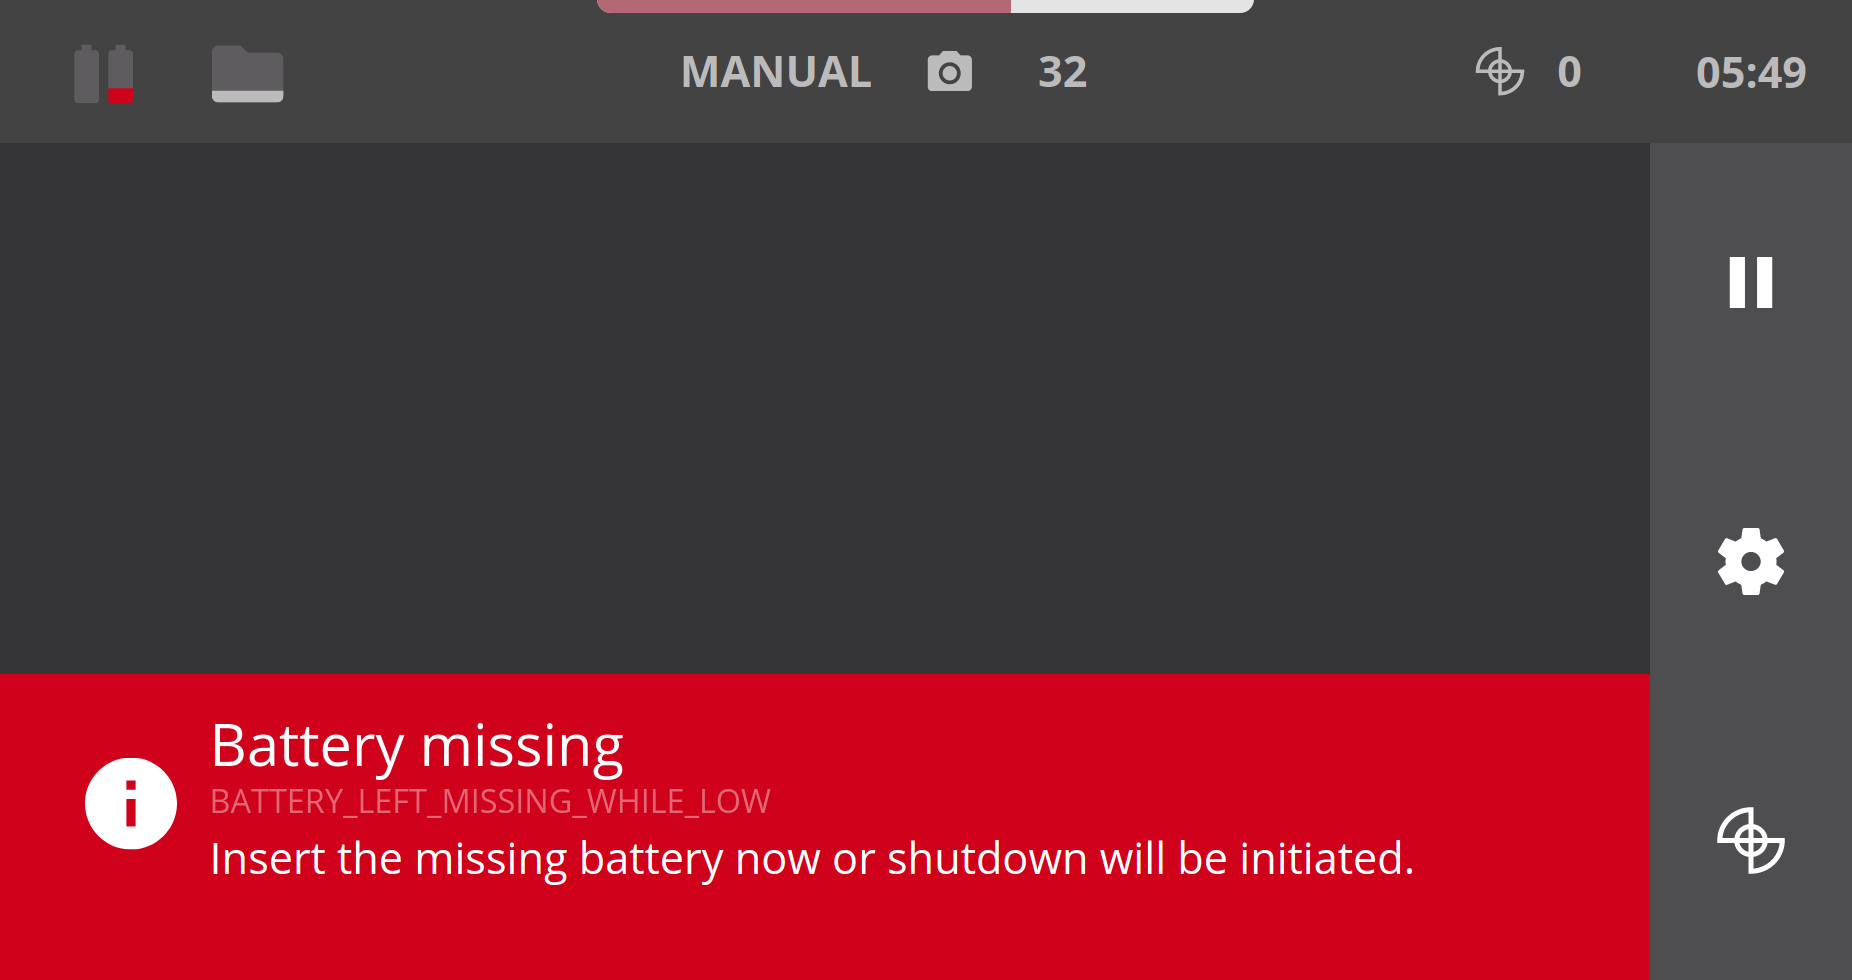
- A red Battery missing critical notification appears when one of the batteries is missing and the other battery is critically low in charge (less than 30% of charge left). Before continuing, immediately insert a second fully charged battery or the NavVis VLX will initiate a safe shutdown after one minute.
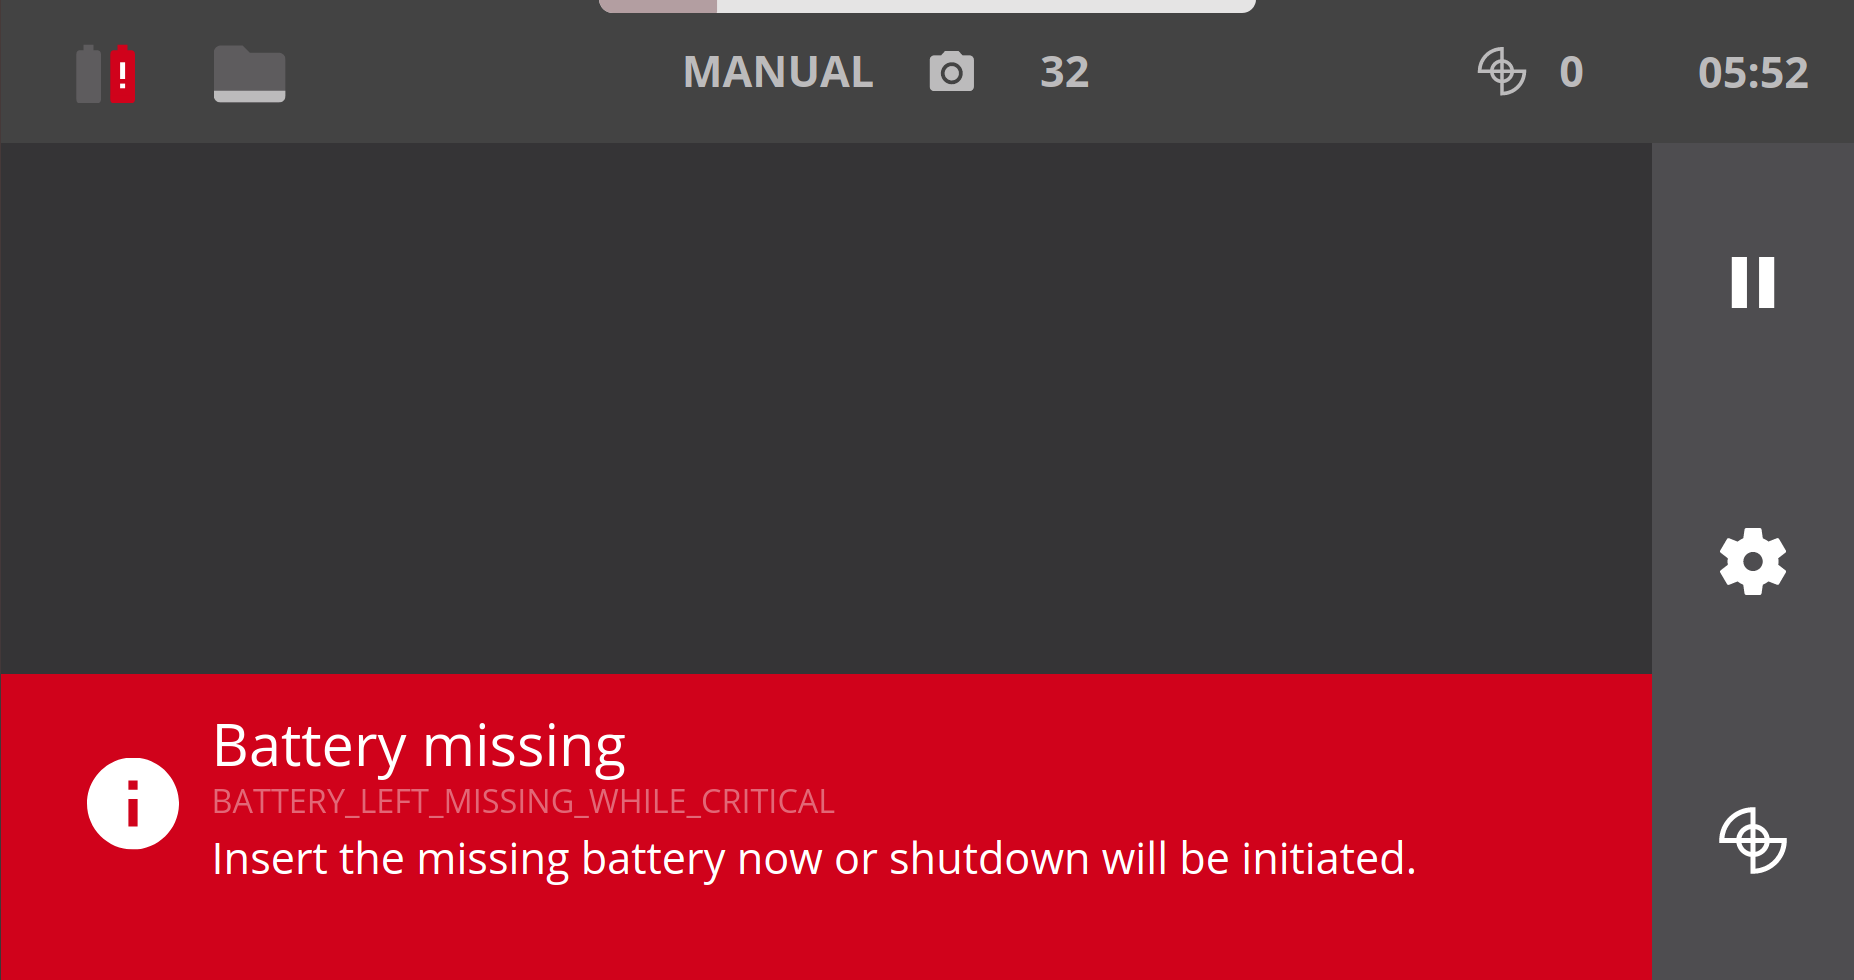
- A red Battery missing critical notification appears when one of the batteries is missing and the other battery is critically low in charge (less than 20% of charge left). Before continuing, immediately insert a second fully charged battery or the NavVis VLX will initiate a safe shutdown after one minute.
Battery/Batteries Low
A yellow Battery low warning notification appears when one of the batteries is low in charge. Before continuing, immediately replace the battery with a fully charged battery.

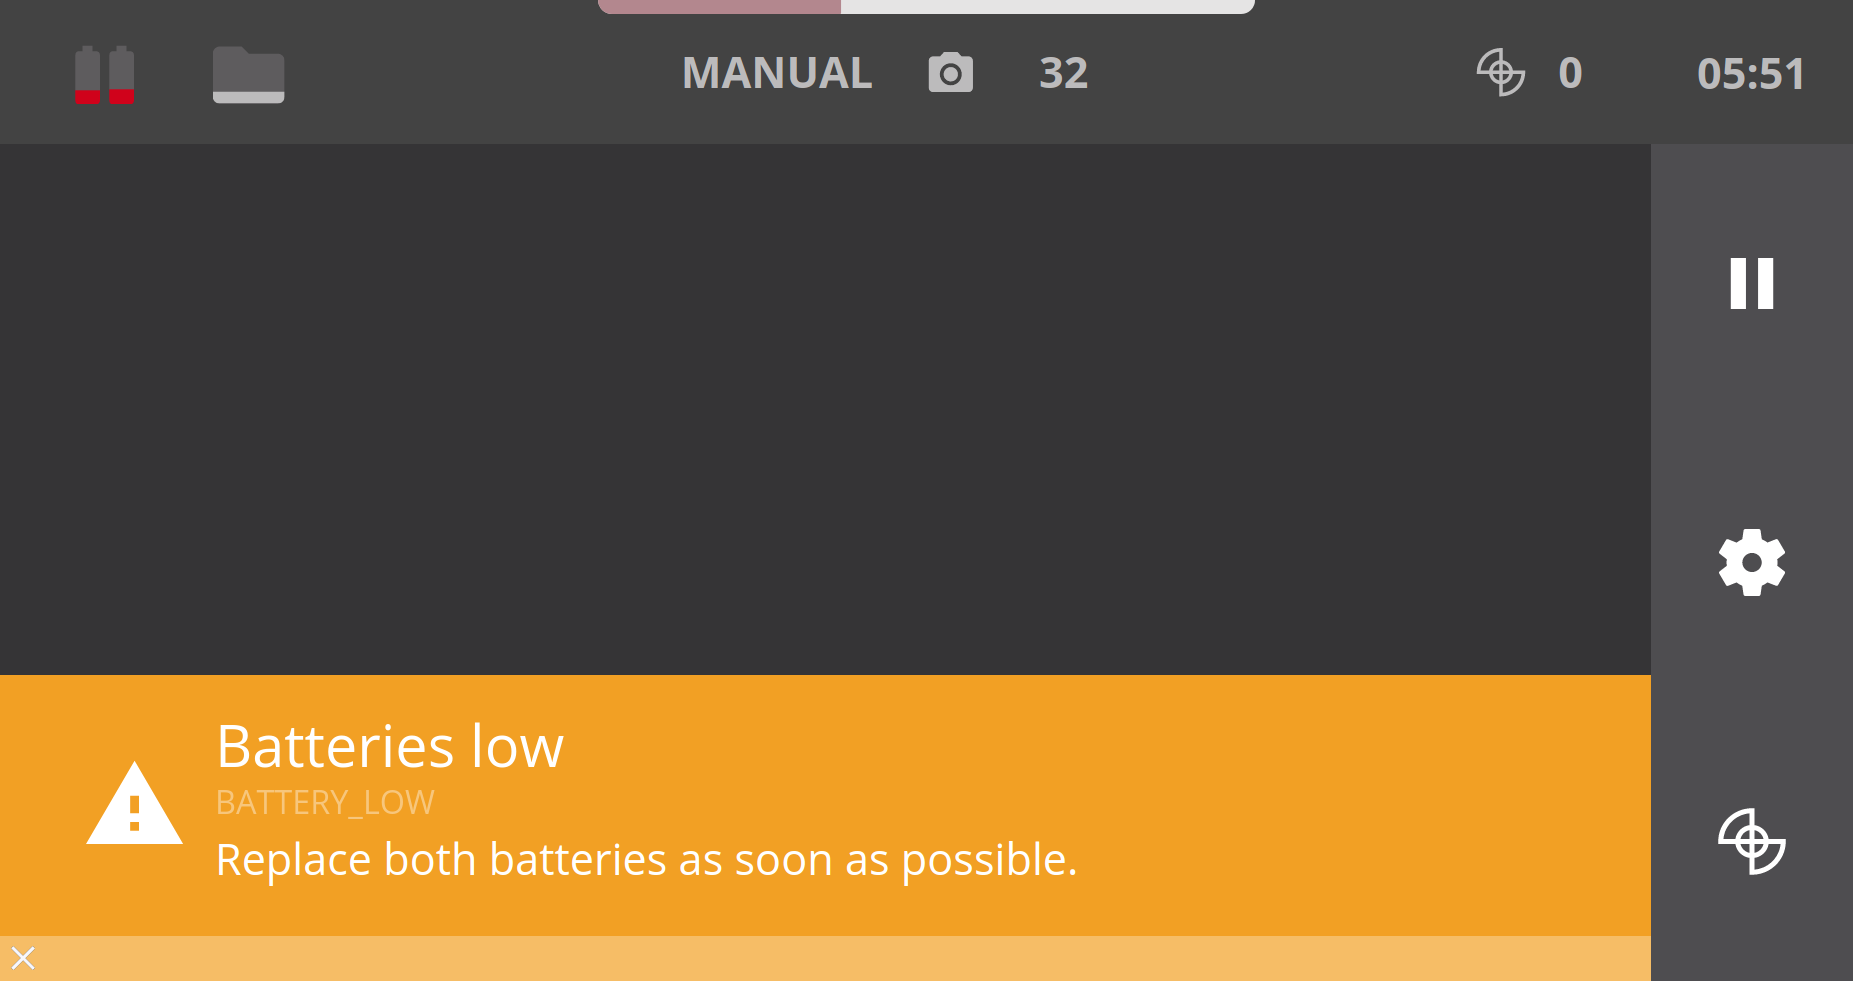
- A yellow Batteries low warning notification appears when both batteries on the NavVis VLX are low in charge. Before continuing, immediately replace both batteries with two fully charged batteries.
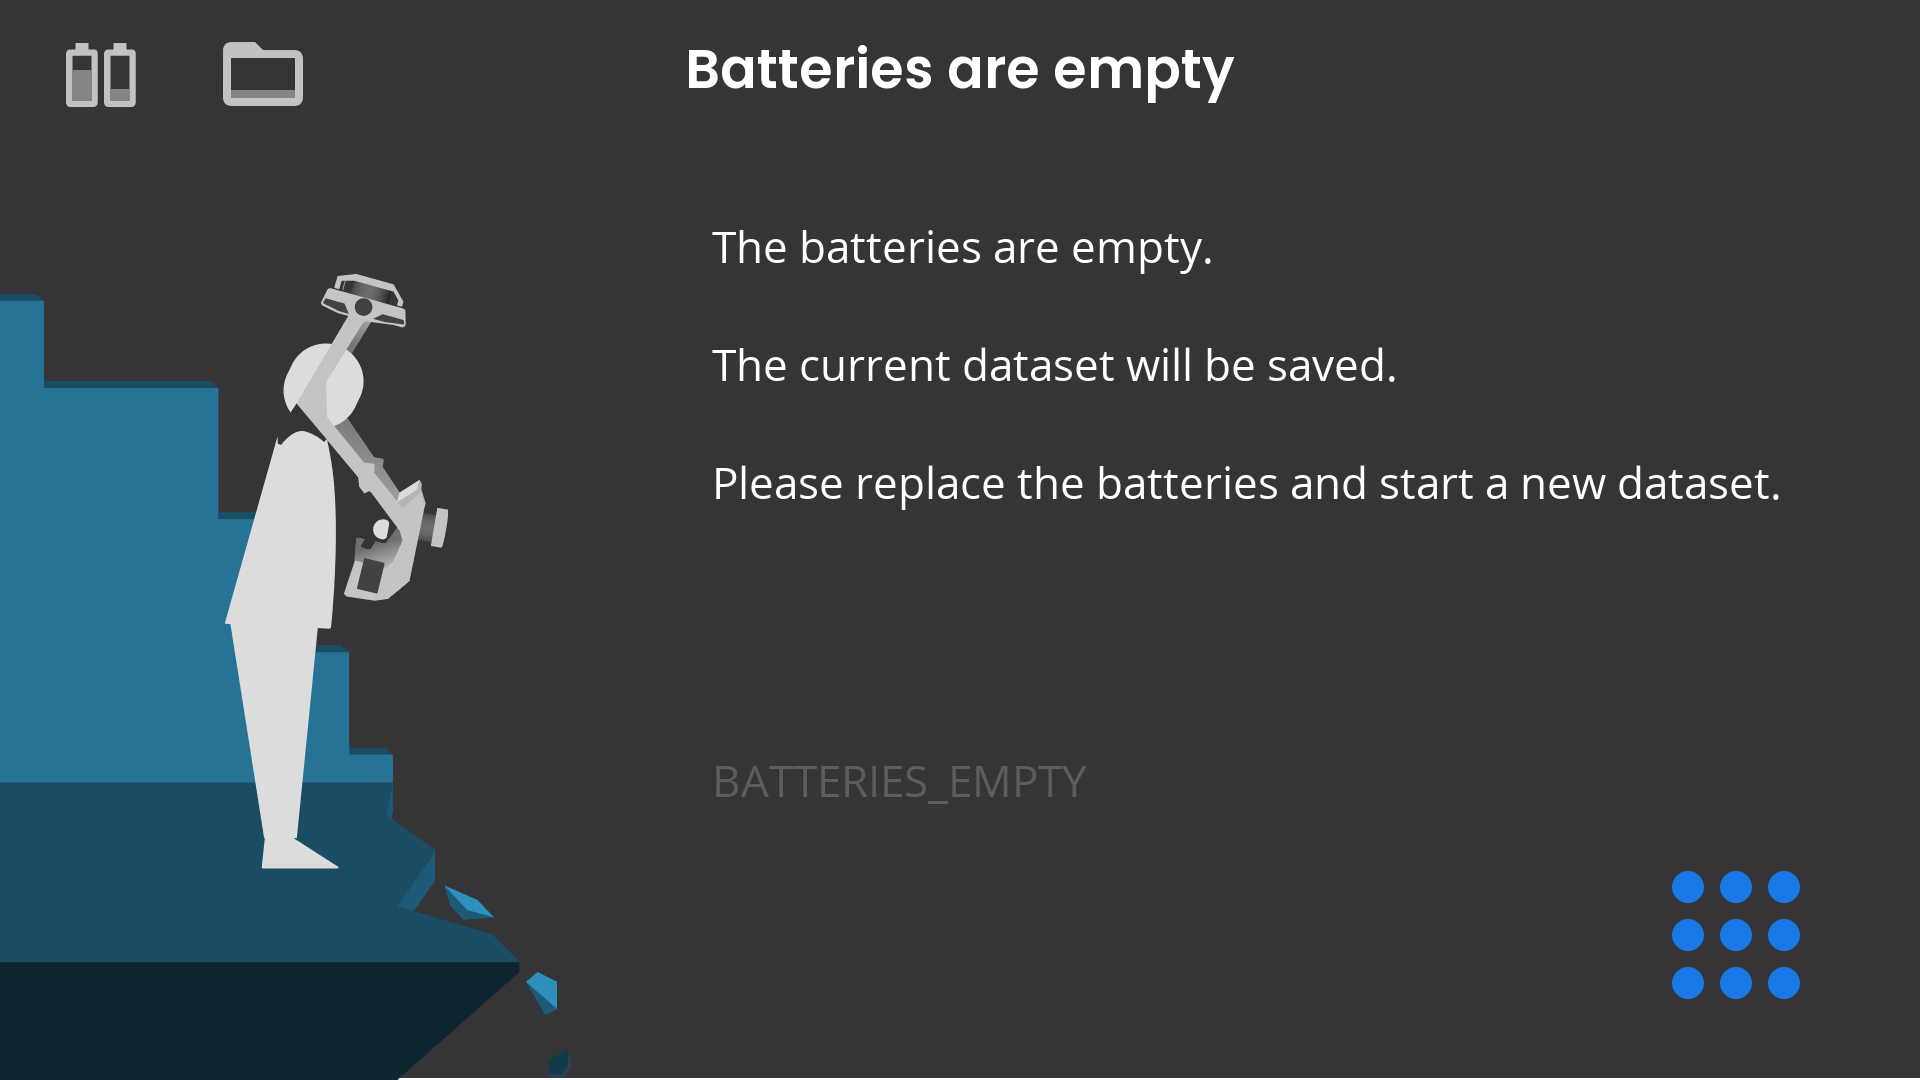
Battery Empty
- A yellow Battery empty warning notification appears when one of the batteries on the NavVis VLX is empty. Before continuing, immediately replace the battery with a fully charged battery.

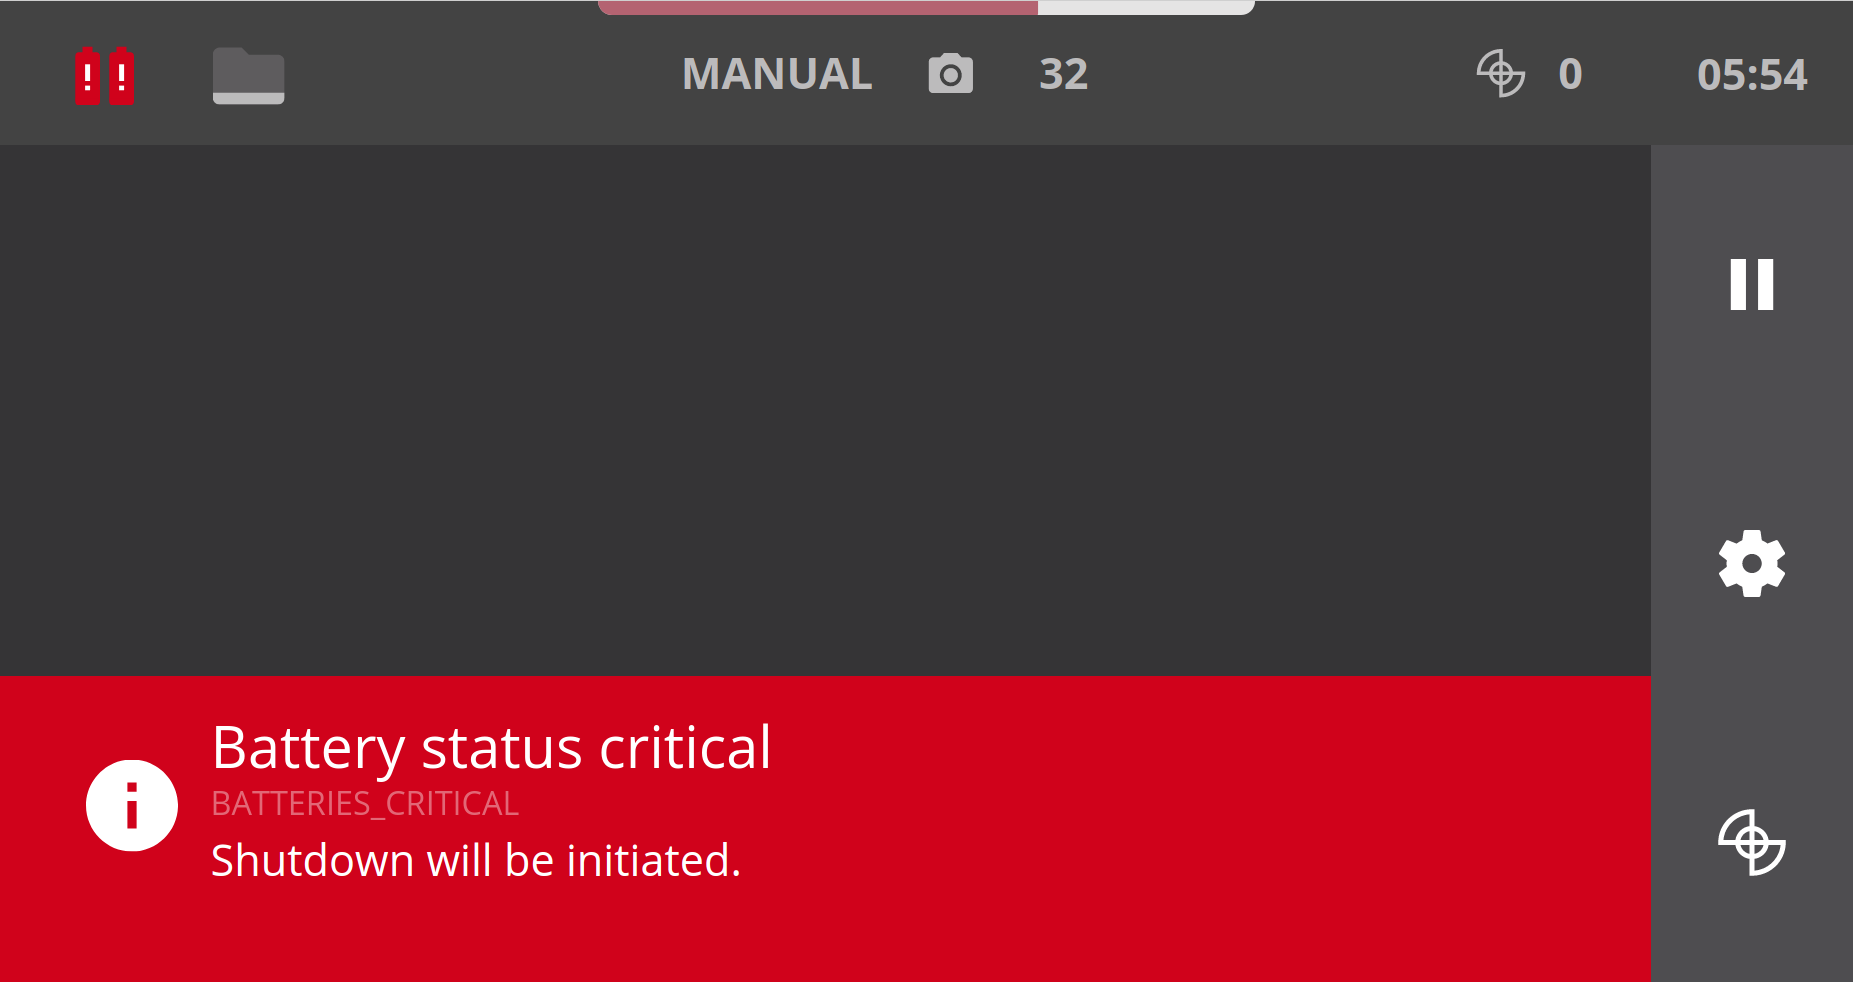
Battery Status Critical
- A red Battery status critical notification means both batteries on the NavVis VLX are critically low in charge (less than 20% charge) and the device will initiate a safe shutdown in five seconds. Before continuing, replace both batteries with fully charged batteries and start the NavVis VLX again.
SSD not Detected on the NavVis VLX
If the SSD is not found, the following error will appear:
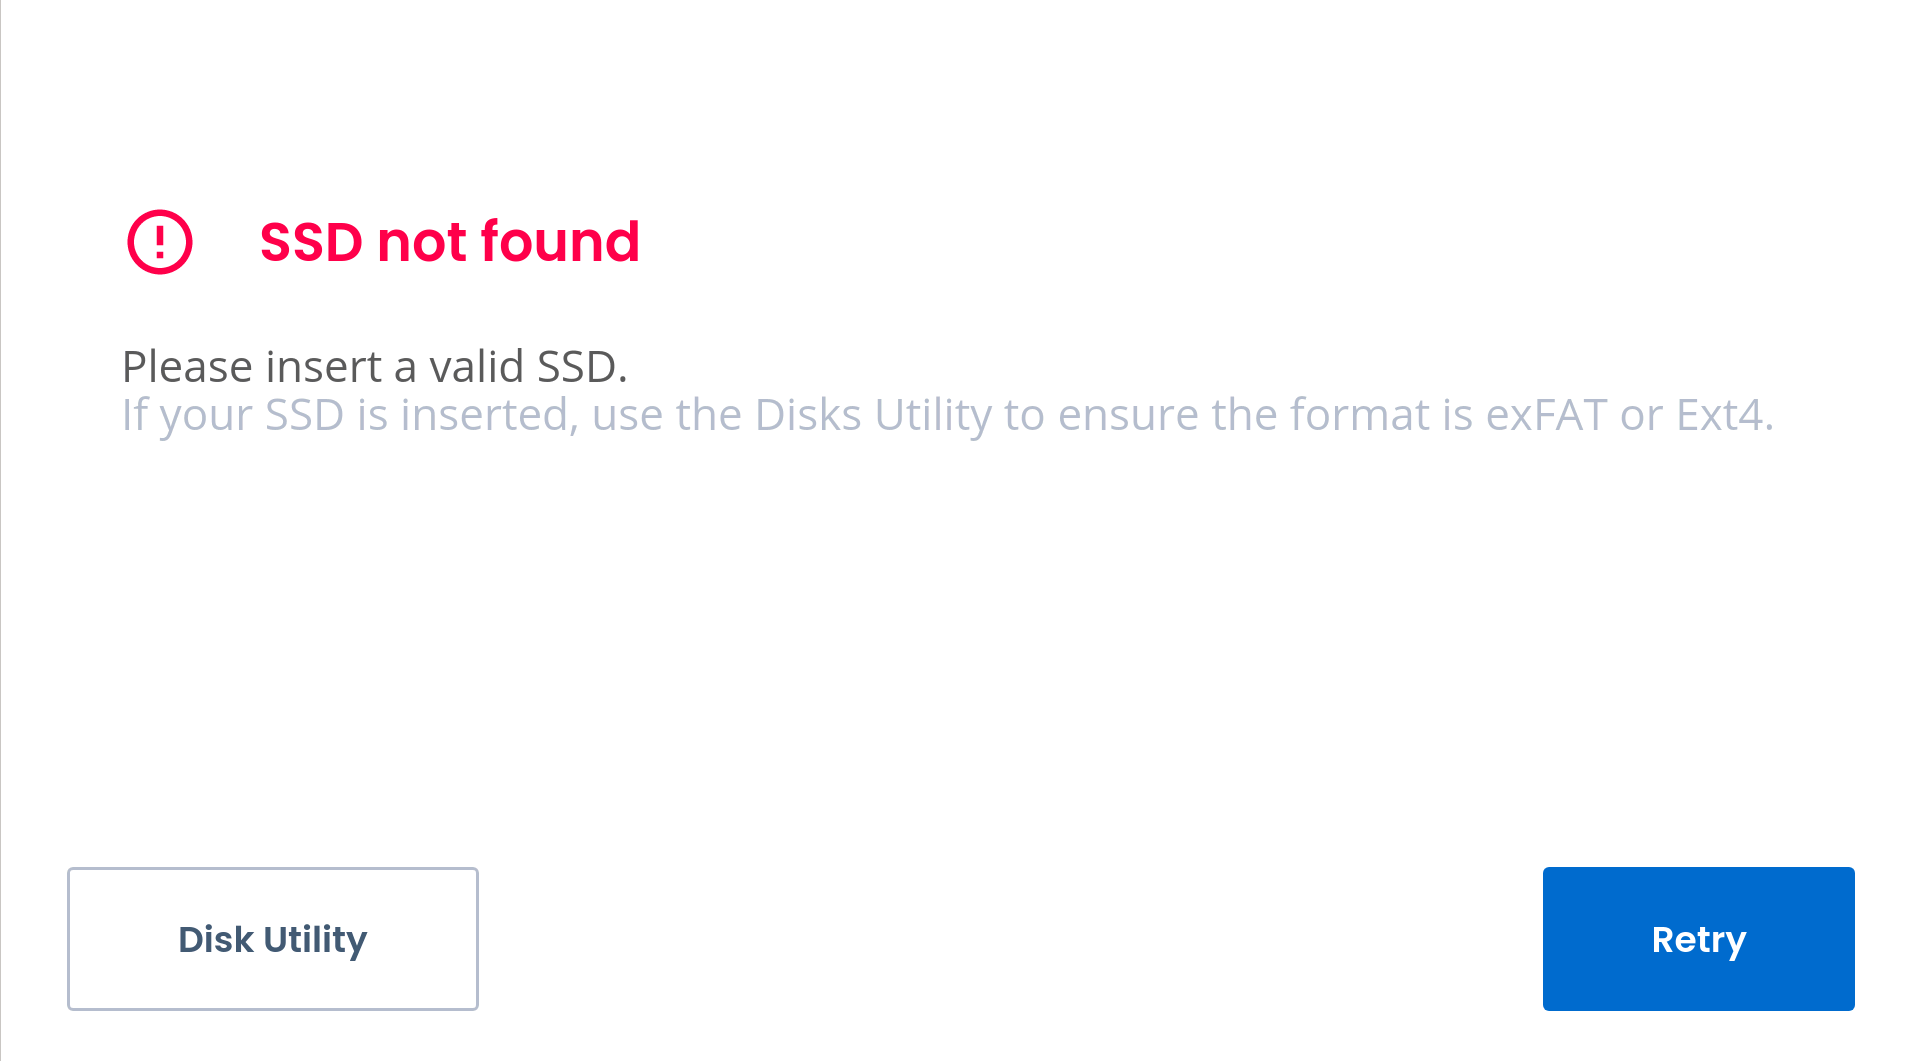
To fix this problem, follow these steps:
- If the SSD is missing, insert it into the NavVis VLX. If the SSD is in the NavVis VLX, tap Disk Utility to make sure the format is exFAT or Ext4.
- Tap Retry.